一直以来对网络请求框架都停留在一个只会用的阶段,okhttp是一个相对成熟的网络请求的解决方案,Android4.4的源码中可以看到HttpURLConnection已经替换成OkHttp实现了。现在来捋一捋okhttp的架构和网络请求的实现方案。
使用HttpURLConnection
- 实例化URL对象,传入链接地址
- 使用url.openConnection()实例化HttpURLConnection对象
设置参数
1 2 3 4 5 6 7 8
| conn.setDoInput(true); conn.setDoOutput(true); conn.setUseCaches(false); conn.setRequestProperty("Content-Type", "application/x-javascript; charset="+ encoding); conn.setRequestProperty("Content-Length", String.valueOf(data.length)); conn.setConnectTimeout(5*1000); conn.setRequestMethod("GET");
|
conn.getInputStream()将阻塞线程等待服务器响应
1 2 3 4 5 6 7 8 9 10 11 12
| is = conn.getInputStream(); InputStreamReader isr = new InputStreamReader(is); BufferedReader bufferReader = new BufferedReader(isr); String inputLine = ""; while((inputLine = bufferReader.readLine()) != null){ resultData += inputLine + "\n"; } --- 或者 InputStream is = conn.getInputStream(); bitmap = BitmapFactory.decodeStream(is);
|
网络请求不能在UI线程中进行,可通过AsyncTask或者Thread和handler搭配将数据返回UI线程并更新显示。
okhttp实现与源码分析
- 支持HTTP2/SPDY黑科技
- socket自动选择最好路线,并支持自动重连
- 拥有自动维护的socket连接池,减少握手次数
- 拥有队列线程池,轻松写并发
- 拥有Interceptors轻松处理请求与响应
- 基于Headers的缓存策略
1 2 3 4 5 6 7 8 9 10 11 12 13 14 15 16 17 18
| OkHttpClient mOkHttpClient = new OkHttpClient(); final Request request = new Request.Builder() .url("https://github.com/hongyangAndroid") .build(); Call call = mOkHttpClient.newCall(request); call.enqueue(new Callback(){ @Override public void onFailure(Request request, IOException e){} @Override public void onResponse(final Response response) throws IOException { String htmlStr = response.body().string(); } });
|
请求步骤:
- 构造Request对象,通过Request.Builder设置header、method等参数
- 构造Call对象,将请求封装成任务
- call.enquene()将call加入调度队列
1. Dispatcher线程分发
- runningAsyncCalls 正在运行的任务,仅仅是用来引用正在运行的任务以判断并发量,注意它并不是消费者缓存
- readyAsyncCalls 缓存(用数组实现,可自动扩容,无大小限制)
- maxRequests = 64: 最大并发请求数为64
- maxRequestsPerHost = 5: 每个主机最大请求数为5
执行call.enqueue/execute时将Call放到了Dispatcher中
1 2 3 4 5 6 7 8 9 10
| @Override public Response execute() throws IOException { try { client.dispatcher().executed(this); Response result = getResponseWithInterceptorChain(); if (result == null) throw new IOException("Canceled"); return result; } finally { client.dispatcher().finished(this); } }
|

执行call.execute()是直接将call加入到runningSyncCalls中(普通的同步单线程分发方式),执行call.enqueue()是使用了队列进行并发任务的分发与回调方式。Call是一个接口类,其具体实现是RealCall。下面看执行并发请求的代码:
1 2 3 4 5 6 7 8 9 10 11
| synchronized void enqueue(AsyncCall call) { if (runningAsyncCalls.size() < maxRequests && runningCallsForHost(call) < maxRequestsPerHost) { runningAsyncCalls.add(call); executorService().execute(call); } else { readyAsyncCalls.add(call); } }
|
2. 线程池与任务调度
使用Thread+handler的方式来控制线程,其最大的坑在于其生命周期不可预料,容易出现内存泄漏。okhttp采用了线程池,线程池的关键在于线程复用以减少非核心任务的损耗。其核心在于:
- 采用缓存的方式减少CPU闲置的时间,方便控制并发
- 通过控制线程数量,来控制多线程请求对CPU带来的压力
上面的请求用到了executorService().execute(call),我们来看它的实现:
1 2 3 4 5 6 7 8 9
| public synchronized ExecutorService executorService() { if (executorService == null) { executorService = new ThreadPoolExecutor(0, Integer.MAX_VALUE, 60, TimeUnit.SECONDS, new SynchronousQueue<Runnable>(), Util.threadFactory("OkHttp Dispatcher", false)); } return executorService; }
|
再来看上面出现的AsyncCall,其继承自Runnable,其复写的run()方法内部调用了execute()方法。
1 2 3 4 5 6 7 8 9 10 11 12 13 14 15 16 17 18 19 20 21
| @Override protected void execute() { boolean signalledCallback = false; try { Response response = getResponseWithInterceptorChain(); if (retryAndFollowUpInterceptor.isCanceled()) { signalledCallback = true; responseCallback.onFailure(RealCall.this, new IOException("Canceled")); } else { signalledCallback = true; responseCallback.onResponse(RealCall.this, response); } } catch (IOException e) { responseCallback.onFailure(RealCall.this, e); } finally { client.dispatcher().finished(this); } }
|
关键则在于getResponseWithInterceptorChain()方法,其添加了很多拦截器(Interceptor),最后使用了RealInterceptorChain.proceed()方法,它先执行拦截器里面的逻辑并判断是否要继续执行拦截器里的内容还是直接进行网络请求。
3.拦截器 Interceptors
继续看getResponseWithInterceptorChain()的实现代码:
1 2 3 4 5 6 7 8 9
| private Response getResponseWithInterceptorChain() throws IOException { List<Interceptor> interceptors = new ArrayList<>(); interceptors.addAll(client.interceptors()); interceptors.add(retryAndFollowUpInterceptor); Interceptor.Chain chain = new RealInterceptorChain( interceptors, null, null, null, 0, originalRequest); return chain.proceed(originalRequest); }
|
拦截器是okhttp中强大的流程装置,它可以用来监控log,修改请求,修改结果等。上面的代码维护了一个Interceptors的List,并通过InterceptorChain进行多次拦截修改操作。
调用RealInterceptorChain.proceed()时,其递归调用Interceptors对response进行处理,当全部递归完成后,返回response。
1 2 3 4
| RealInterceptorChain next = new RealInterceptorChain( interceptors, streamAllocation, httpStream, connection, index + 1, request); Interceptor interceptor = interceptors.get(index); Response response = interceptor.intercept(next);
|
index递增,从interceptors列表中获取interceptor,并继而执行intercept方法。
如BridgeInterceptor对Request.Builder进行了进一步的处理;CacheInterceptor则判断是否已经有缓存好的Response以及是否还需要进行网络请求;CallServerIntercepter则是通过Okio封装好RequestBody,然后通过httpStream进行请求(request)、握手(handshake)并获取到response。
各个Interceptor的功能:
- RetryAndFollowUpInterceptor 负责失败重试以及重定向
- BridgeInterceptor 负责把用户构造的请求转换为发送到服务器的请求、把服务器返回的响应转换为用户友好的响应
- CacheInterceptor 负责读取缓存直接返回、更新缓存
- ConnectInterceptor 负责和服务器建立连接
- NetworkInterceptors 配置 OkHttpClient
- CallServerInterceptor 负责向服务器发送请求数据、从服务器读取响应数据
4.网络请求,建立连接
继续研究ConnectInterceptor和CallServerInterceptor:
1 2 3 4 5 6 7 8
| @Override public Response intercept(Chain chain) throws IOException { boolean doExtensiveHealthChecks = !request.method().equals("GET"); HttpStream httpStream = streamAllocation.newStream(client, doExtensiveHealthChecks); RealConnection connection = streamAllocation.connection(); return realChain.proceed(request, streamAllocation, httpStream, connection); }
|
streamAllocation.newStream()方法中使用findHealthyConnection()方法找到一个可用的连接(RealConnection),再利用 RealConnection 的输入输出(BufferedSource 和 BufferedSink)创建 HttpStream 对象。
1 2 3 4 5 6 7 8 9 10 11 12 13 14 15 16 17 18 19 20 21 22 23 24 25 26 27 28 29 30 31 32 33 34 35 36 37 38 39 40 41 42 43 44 45 46 47 48 49 50
| @Override public Response intercept(Chain chain) throws IOException { HttpStream httpStream = ((RealInterceptorChain) chain).httpStream(); StreamAllocation streamAllocation = ((RealInterceptorChain) chain).streamAllocation(); Request request = chain.request(); long sentRequestMillis = System.currentTimeMillis(); httpStream.writeRequestHeaders(request); if (HttpMethod.permitsRequestBody(request.method()) && request.body() != null) { Sink requestBodyOut = httpStream.createRequestBody(request, request.body().contentLength()); BufferedSink bufferedRequestBody = Okio.buffer(requestBodyOut); request.body().writeTo(bufferedRequestBody); bufferedRequestBody.close(); } httpStream.finishRequest(); Response response = httpStream.readResponseHeaders() .request(request) .handshake(streamAllocation.connection().handshake()) .sentRequestAtMillis(sentRequestMillis) .receivedResponseAtMillis(System.currentTimeMillis()) .build(); if (!forWebSocket || response.code() != 101) { response = response.newBuilder() .body(httpStream.openResponseBody(response)) .build(); } if ("close".equalsIgnoreCase(response.request().header("Connection")) || "close".equalsIgnoreCase(response.header("Connection"))) { streamAllocation.noNewStreams(); } int code = response.code(); if ((code == 204 || code == 205) && response.body().contentLength() > 0) { } return response; } @Override public ResponseBody openResponseBody(Response response) throws IOException { Source source = new StreamFinishingSource(stream.getSource()); return new RealResponseBody(response.headers(), Okio.buffer(source)); }
|
RealConnection是进行网络连接最核心和最底层的实现,实现了Socket握手连接。RealConnection成功建立后会被添加到ConnectionPool连接池。
5.缓存CacheInterceptor
- 获取缓存策略
根据Request获取Response并作为缓存的候选者
1
| Response cacheCandidate = cache != null ? cache.get(chain.request()) : null;
|
InternalCache存在时跟踪Response
- 找到Response,更新并返回Response
具体的缓存逻辑 OkHttp 内置封装了一个 Cache 类,它利用 DiskLruCache,用磁盘上的有限大小空间进行缓存,按照 LRU 算法进行缓存淘汰。查看源代码
6.线程池具体实现
1 2 3 4 5 6 7 8
| private static final Executor executor = new ThreadPoolExecutor(0 , Integer.MAX_VALUE , 60L , TimeUnit.SECONDS, new SynchronousQueue<Runnable>(), Util.threadFactory("OkHttp ConnectionPool", true)); final RouteDatabase routeDatabase = new RouteDatabase(); private final Deque<RealConnection> connections = new ArrayDeque<>();
|
SPDY协议
SPDY 是 Google 开发的基于传输控制协议 (TCP) 的应用层协议,SPDY 协议旨在通过压缩、多路复用和优先级来缩短网页的加载时间和提高安全性。SPDY 的目的是为了加强 HTTP,是对 HTTP 一个更好的实现和支持,且基本上兼容 HTTP 。
HTTP协议的不足:
- 单路请求,效率较低 严格FIFO,易阻塞
- HTTP只允许由客户端主动发起请求
- HTTP头冗余,浪费带宽和资源
SPDY协议:
- 多路复用 请求优化
- 压缩了HTTP头
- 强制使用SSL传输协议
- 支持服务器推送技术
目前Google已放弃SPDY,由HTTP2.0取代。
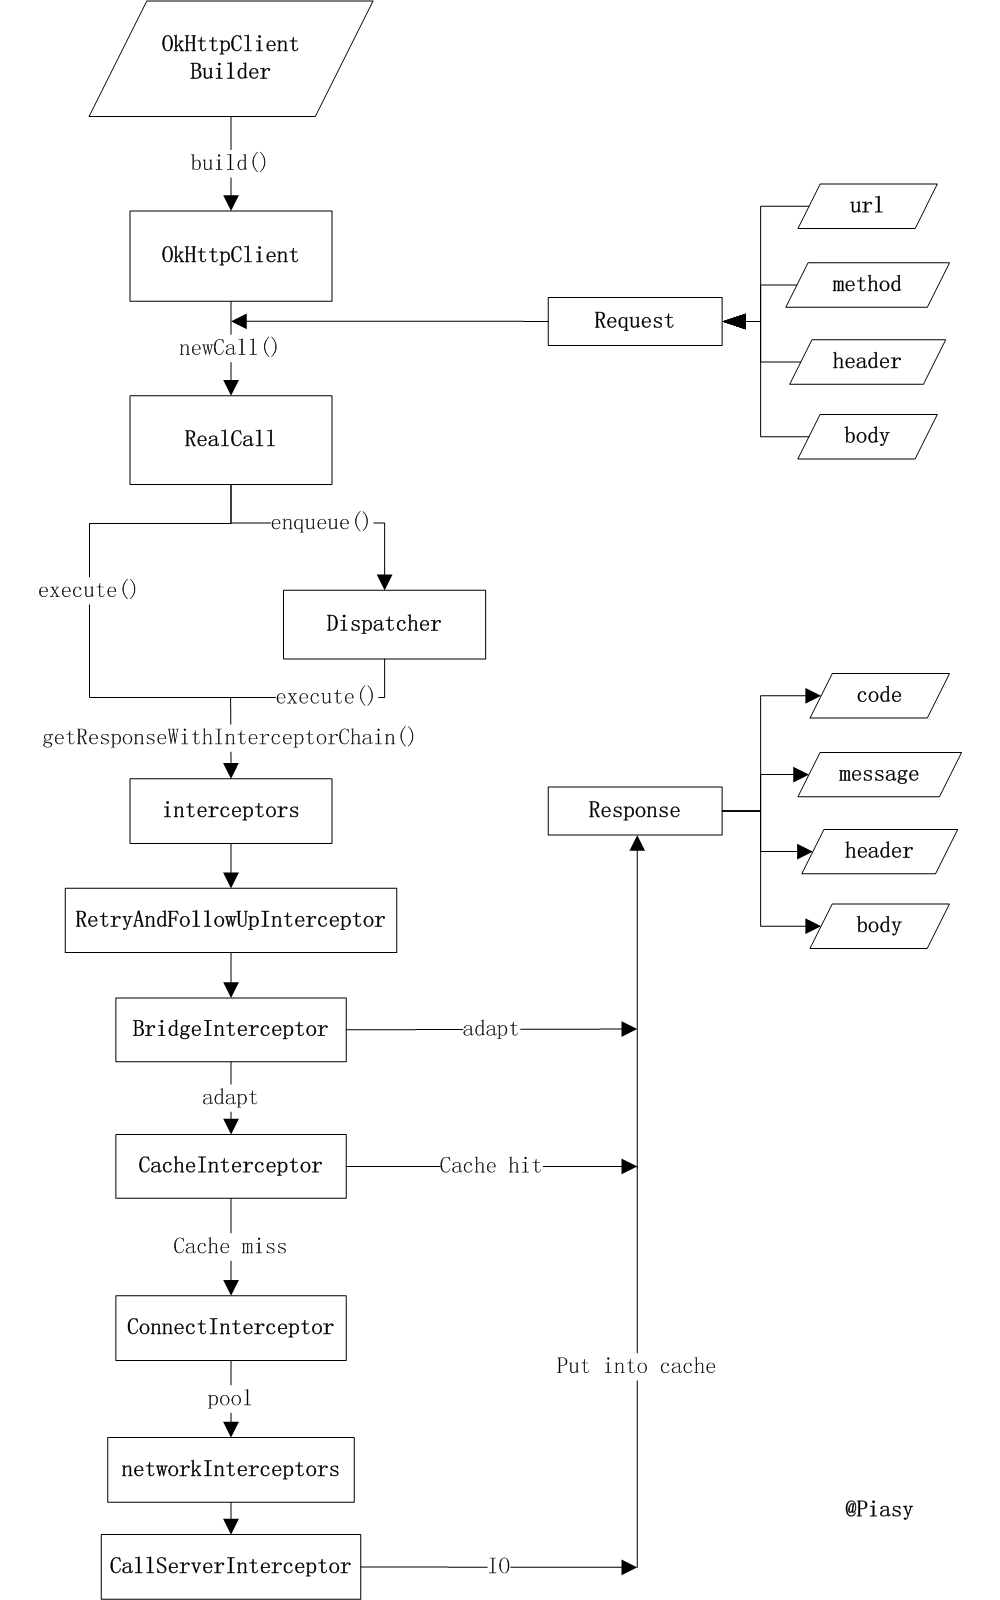
主干线
- OKHttpClient -> RequestBody -> RealCall -> Dispatcher -> ExecutorService -> AsyncCall -> Interceptor -> InterceptorChain -> Interceptor -> … -> Response;
- 网络请求,数据缓存,IO操作等都是在Interceptor中递归操作;
- 任务管理,线程引用计数,线程调度都在Dispatcher及ExecutorService中进行;
- 采用keep-alive connections机制,当客户端需要再次获取数据时,直接使用刚刚空闲下来的连接而不需要再次握手。Okhttp默认支持5个并发,默认链路生命为5分钟;
参考博客
TODO :
缓存策略 线程调度具体实现 连接池复用 网络请求、握手操作 …